Production Designer • Art Director • Concept Artist • Illustrator • Matte Artist


Welcome to my website!

OK, technically it's a blog site...but you get the point.


My intent here is to post my artwork...mostly paintings from the various films I've worked on over the years. But you never can tell...I'm sure there'll be photos, the odd rant here and there, and hopefully some tutorials along the way. So stay tuned!


Saturday, March 7, 2009

Saturday Morning Sketch #4

Flowers are really fun to paint. If you've got a good underlying structure, and you make good colors choices, you can be incredibly loose and they'll still read as flowers.

Saturday, February 21, 2009

Saturday Morning Sketch #3

My family and I spent a few weeks in Italy last summer. There's so much art there - it's impossible not to be inspired. Of course I shot tons of pictures! Here's a painting based on one of them.

Once again, I painted this using Corel Painter. Though I do most of my work in Photoshop, for getting the look of oil paint, Painter still can't be beat.

(No, I didn't paint the entire thing this morning. Most of it, I painted the other night...but I finished it today.)


Here's my lay in...after about an hour of work. One of the nice things about digital painting, is you can keep the early versions of paintings. Often, the under painting is just as interesting as the final product.

Saturday, February 7, 2009

Saturday Morning Sketch #2

Here's another quick Saturday morning painting sketch. This one's based on a photo I took from a helicopter somewhere over New Zealand. Most of you know that I worked as an Art Director on the Lord of the Rings. But I also had the great fortune of being in charge of the Scenic Photography Unit. We did most of our work from a helicopter. Actually, two helicopters (but who's counting?) By far the coolest gig I've ever had! Needless to say, I shot a lot of pictures (sadly, before I got a digital camera.)

Sunday, January 11, 2009

Saturday Morning Sketch

Here's a quick sketch I did in Painter yesterday morning while I was waiting for my family to wake up. Painter's insanely overcomplicated, but there's a few things about it that I love - like their "Oil" brushes. Not the new ones from version 10, which are clunky...but the original ones. My favorites are the brushes called "Smeary Round" and "Smeary Flat". What's cool about them is that they can apply color and smear color in the same stroke. No changing tools. Something Photoshop can't do...as far as I know.


Friday, December 19, 2008

The Prince of Egypt: 10 Year Anniversary

Today was the tenth anniversary of the release of The Prince of Egypt. In honor of that, here are a few more of my POE paintings.


Layout: Darek Gogol.


Layout: Darek Gogol.


Layout: Darek Gogol.

Thursday, December 4, 2008

Rare Sketchbook Doodle

I don't tend to post sketchbook drawings...mostly because they're usually just shorthand notes for paintings, and not worth looking at. But this one I like. Durring my Dick Tracy days, I did a lot of these little city composition sketches. In fact, there was a while there, where I was doing them on an Etch A Sketch...just for fun. I actually got pretty good at it. Maybe I'll see if I can still do it, and post the results.

Maybe.

Saturday, November 22, 2008

Late Night Sketch

It's been a while. Couldn't sleep this evening, so while surfing the blogs, I came upon a nice painting by Erin Lamoreux where she used a square brush for leaves. I just had to try it. Thanks Erin!

Monday, July 21, 2008

Nintendo DS

Last year, my wife bought me a Nintendo DS with the hopes of using it as a digital sketch book. It's been sitting in the box since December, but I finally got all the necessary software and got it running last week.

Here are my first feeble attempts to paint on the thing. I have one thing to say...it ain't a Cintiq! The 2" screen, two brush choices (soft-round & hard-round), no undo function, and no selection tools are a long way from Photoshop CS3. But stripping all the bells and whistles away from the digital painting experience is quite humbling and darn good practice.

I'm going on a trip to Italy with my family soon and I'm taking it with me. Hopefully I'll have a few sketches to post when I get back. (And hopefully they'll be better than these!)


Sunday, April 6, 2008

Quick Flower Sketch

I know it's been a while since I've posted. I've been very busy on a new film at Sony, and all my painting time is spent on stuff I can't post...for several years;(

In the meantime, I guess I'll just have to be better about finding time to paint for me. I painted the flowers below for practice. It went pretty quick...no more than an hour.


Based on a photo by Francis Fukuyama.

Thursday, February 28, 2008

Photoshop "Pencil" Brush

Ever wish there was a decent pencil brush in Photoshop? You can make one.

1. Start with this brush. It's one of the standard Photoshop brushes.


2. In the Shape Dynamics section of the Brushes palette, set the Size Control to Pen Pressure and set the Angle jitter to 100%.


3. Next, in the Brush Tip Shapes section, set the Spacing to something like 20%. Spacing will control what looks like paper-grain.
(Note: as with all brushes, if the spacing is set too low, you run the risk of bogging down the speed performance of the brush...especially with large brushes.)


This is the basic brush, but you can always add other dynamics. I'll often add an opacity control to the brush (found in "Other Dynamics"), so I can get the effect of a light touch.


Remember, these dynamics can be adjusted depending upon your needs. For instance, if you don't want your pencil co come to a sharp point at low pressure, turn down the Size Control (from step 1). Or turn it off entirely.

OK, that's pretty much it. Now go draw!

Wednesday, February 20, 2008

Drawings!

Yes, I do draw from time to time. Here are a few rare Paul Lasaine layout drawings done for a film at Dreamworks that'll probably never grace the silver screen. I'm not sure if I'm allowed to show them, but hey...it's been more than 5 years for crying out loud. There's gotta be some kind of statute of limitations for this kind of thing.

They're mostly black Sharpie on white paper. I used several pens in various stages of life. Some were very dry. I drew the facade in the first and last drawings separately, then composited it into the final drawings in Photoshop.


Sunday, February 3, 2008

The Phantom 2040

In the early '90s, I did a few concept illustrations for an animated series called "The Phantom 2040". The show got great reviews, but didn't last long...33 episodes...none of which I ever saw. Consequently, I have no idea if any of my designs were even used. But I was pretty happy with a few of the paintings, so here they are.

Sorry for the obvious Syd Mead / Blade Runner rip off; it's what they wanted. I had just finished work on Dick Tracy, and the producers specifically wanted their city to look like a cross between Dick Tracy and Blade Runner. Syd Mead was way too expensive, so I got the job.
(They're all painted in acrylic.)

The City


City : Detail


Arch Nemesis' Office


Police Chief's Office

Saturday, January 26, 2008

Half Dome

Here's an oldie. I have to say, I miss real paint...


Acrylic

And for those of you who like to see the brush strokes...

Saturday, January 12, 2008

Lily Pond Floor Mat

OK, this is one of the stranger projects I've worked on. It's a hand painted floor mat. Yes, a floor mat. The idea came from my mother-in -law (also an artist) who did something similar in her kitchen. My wife wanted one too.

It's acrylic on very thick canvas...varnished heavily. Yes you can walk on it:)


Tuesday, January 8, 2008

Photoshop Brush Tutorial

(New-and-Improved Version)

As promised, here's a tutorial (hopefully the first of many) on some of the ways I use Photoshop's brushes. (For those of you who are already Photoshop experts, this will probably be a bit of a repeat. Oh, and for this tutorial, I'm using Photoshop 7. Anyone working with an earlier version won't be able to play along. If you have a later version, you'll have a few more bells and whistles, but the basics are the same.)

For the longest time, I had trouble painting from scratch in Photoshop. I just couldn't do the kind of things with the PS brushes that I could with traditional brushes. All that changed with the brush controls Adobe introduced in Photoshop 7 (which actually owes a big debt of gratitude to the Painter brush controls, from which PS "borrowed" liberally. But then they borrow from each other. Right? ;)

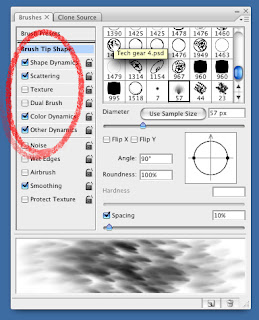
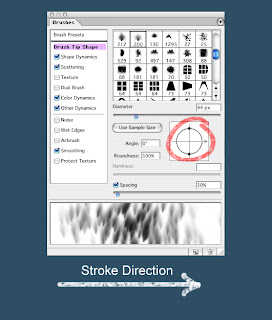
You'll find the brush controls on the "Brush" palette.


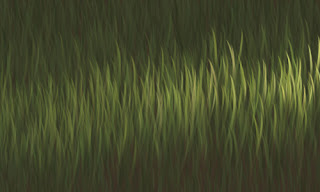
In a practical application using the old brushes, if I wanted to paint grass, I'd have to paint each blade individually. With the new brushes, I can paint an entire field of grass with just a few brush strokes.


Using the PS brush controls you can create brushes that have all kinds of variations and textures. There are controls for Shape, scattering, color, texture etc. Try experimenting a little, and you'll start to see the possibilities.

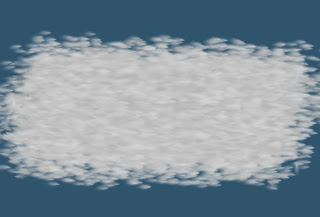
Here's one of the stock Photoshop brushes with a whole bunch of brush control variations turned on. (This a single stroke, by the way.)


In the following tutorial, I'll explain how I used Photoshop's brushes to paint the feathers on Cody from "Surf's Up - post #12".


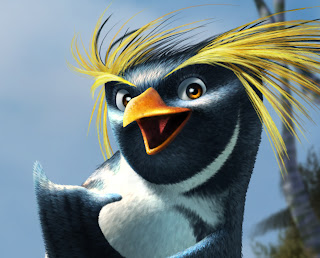
The first thing I do when painting anything, whether traditionally or digitally, is choose an appropriate brush. I'm a big fan of letting the brush do the work. If I'm painting hair, I want to choose a brush that makes marks that look like hair. One of my favorite things about digital painting is you can make brushes that work like rubber stamps on steroids.

For painting Cody's feathers, I figured rather than trying to make brush strokes that look like feathers, why not paint a feather, and use it as a brush. And that's exactly what I did.

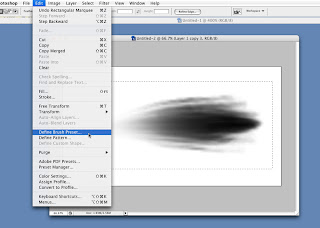
If you've never made a Photoshop brush...here's how you do it:

Any image can be turned into a brush. Photoshop uses gray scale info to make brushes. Simply put a selection marquee around an image you want to turn into a brush, and pull down the "Edit" menu to "Define Brush". In this case, a painting of a single penguin feather. Keep in mind that dark pixels will become your brush. (Black pixels will be solid, gray pixels will be semi-transparent, and white pixels will be empty space.)


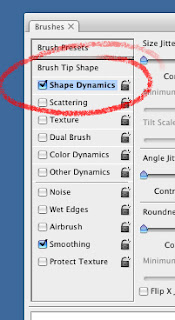
Once you've got your brush defined, you can do all sorts of fancy things with it by using the brush controls in the Brush Palette.

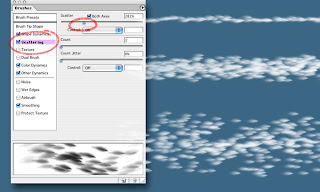
To add brush controls, click on the button that corresponds to the aspect you want to adjust (Shape Dynamic, Scatter, Texture etc.) Clicking the square turns the dynamic on or off. Clicking the word itself brings up an adjustment menu.


Here are the dynamics I used on one of my favorite feather brush:

Shape Dynamics


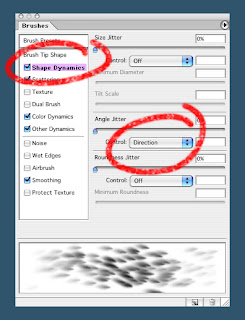
The only shape dynamic I use with this particular brush, is "Direction" which allows me to control the orientation of the "rubber stamped" brush strokes with the direction of my pen stroke. This makes "combing" the feathers (or hair) really easy. By rotating the compass looking thing on the brush palette, you can orient your brush to make marks that go with the direction of stroke...


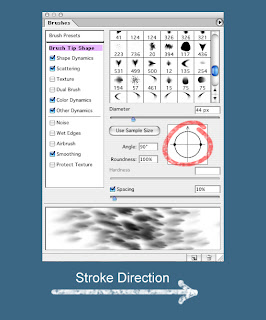
against the direction of stroke...


or anything in between.

Other shape dynamics that I use quit a bit (though not for this particular brush,) are:
Size Jitter (variation)...


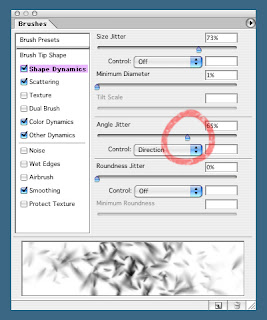
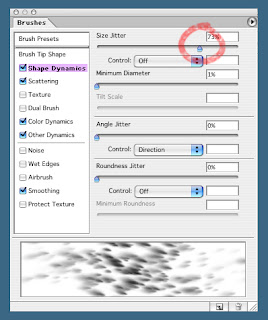
Angle Jitter, which controls the rotation of the brush...


and Roundness Jitter, which controls the squeeze of the brush (This has nothing to do with the round shape in this example. I used a round brush because the feather brush didn't show off the squeeze effect very well.)
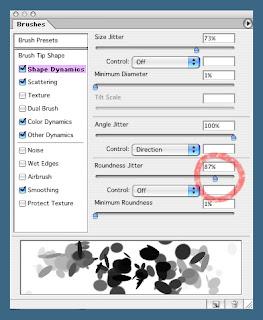


Control
All of these dynamics, as well as most of the other brush dynamics can either be simply on or off, or they can be controlled by your stylus.
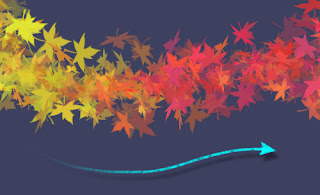


Scattering

Scattering does exactly what it sounds like...it scatters your brush strokes. There are a few options for the amount and density of scatter. Try experimenting. I tend to change this dynamic often while I'm working, depending on my immediate need.
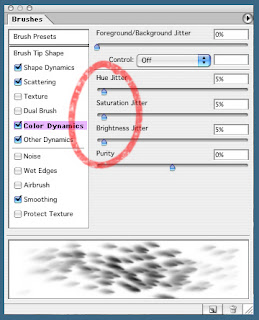


Color Dynamics


There are a number of ways to use the color dynamics. I tend to use it simply as a way of quickly getting subtle color variation into a scattered brush stroke. I do this by adjusting the Hue Jitter, Saturation Jitter, and Brightness jitter. Usually I set them all somewhere between 2% and 5% (higher if I want more color contrast).


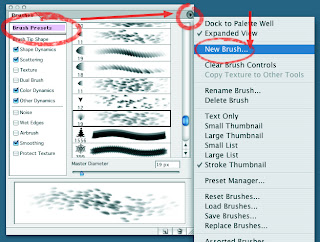
Once you've got your custom brush the way you like it, it's a good idea to save it so you can get back to it later. You can do that in the "Brush Presets" section of the brush palette. Click on the arrow at the top right (the list icon, for later versions of Photoshop), and pull down to New Brush.


So if you're still with me, it's time to start painting!

***Warning! Rule alert!***
This is an example of one method I used to paint feathers. It's by no means the only method. Please don't take this as the definitive way to work. I'm constantly breaking my own rules and trying to come up with different ways of doing things. It keeps things fresh, and forces me to not get too "technique-y".


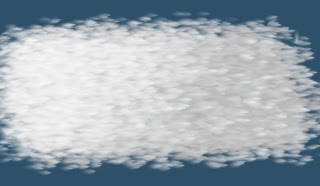
I'll start with a basic flat lay-in with all my brush dynamics turned on. Of course, when I say flat, I simply mean I'm not doing any rendering beyond what the color, shape and scattering dynamics do automatically. I usually start with a mid value color...


...and work my way outward, by building up my lights and shadows. Like with traditional media, I try to keep my lights opaque, and my shadows transparent, which makes the light areas pop out and the shadows recede.


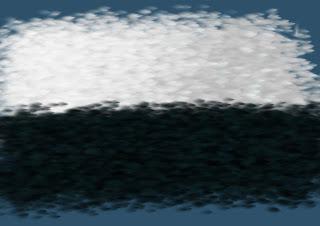
For the black feathers I do the same thing as I did for the light, just with a dark color. Normally, I'd do this on a second layer so I can work on the black areas and the white areas separately, as well as the transition areas. Again, I start flat (ish)...


...and build up lighting as I go.


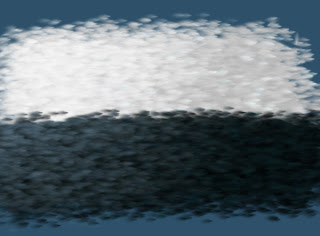
To control the transition area, I pull way back on the level of scatter, and adjust the spacing in order to give me a brush that's only a few feathers wide.

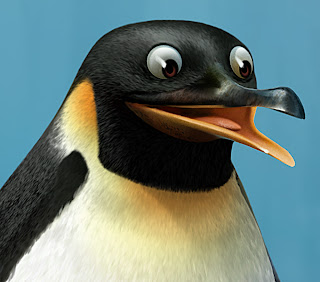
Here's another example of a finished feather painting.

Daniel Simon

Ok, if you're into hi-tech stuff, and vehicle design, and you want to make your eyeballs bleed, check out this guy's work. He's got a brand new book out with Design Studio Press called Cosmic Moters. It will make you cry.

Monday, December 31, 2007

Happy New Year

Hi to all of you out there in Cyberspace. Sorry I've been absent lately. I've got a 5 year old daughter and she takes precedence this time of year:) I've been spending most of my time building a "Log Cabin Doll House" which she specifically asked for this year. My wife bought me a Nintendo DS which I hope to use as a digital sketchbook. Hopefully, I'll post the results...assuming I figure out how to use it. In the meantime, here's a holiday card I made a few years back.

Happy New Year!!!

Tuesday, December 4, 2007

Surf's Up - post #12

Cody

OK, you all must be sick of Surf's Up by now, so this will be my last Surf's Up post.

I'll end with my painting of the lead character, Cody Maverick. It's based on a drawing by our Character Designer, Sylvain Deboissy. The intent of the painting was to figure out what Cody (and all the penguin characters) would actually look like on screen.

Up until this point, we only had Sylvain's pencil drawings and marker comps, and there where a lot of questions about the penguins' finished textures. The biggest question mark was regarding feathers: should they have them or not? One concept that was gaining a lot of ground, was the idea that the penguins should look like their skin was made out of wetsuit material. Real penguins kind of look like they're wearing wetsuits anyway, and since our characters were supposed to be surfers...

The wet suit concept was intriguing, and the directors were definitely leaning in that direction. Partly because it was a fun idea, but also I think because they were afraid that a fully feathered character would look too busy on screen.

I, on the other hand, felt that when all was said and done, no matter how cool the wetsuit concept was, it would end up looking lame on screen...that anything other than a fully feathered character would just look boring...or at best, too cartoony...so I did this painting to sell the studio on what I thought Cody should look like.

In the end, this painting sold everyone on the feather idea...and the rest is history.

Sunday, December 2, 2007

Surf's Up - post #11

Underwater Keys

Here are some keys for the sequence called Tank's Challenge...the one where Cody wipes out on his first wave. Art Director Ron Lucas and I split the duty on this sequence (Ron did the above water keys; I did the underwater keys.)


Thursday, November 29, 2007

Surf's Up - post #10

Baby Cody

This is my painting of Baby Cody based on Sylvain Deboissy's design. Baby Cody ended up being cut from the film, but his design was used for the character, Arnold...minus Cody's signature yellow plume feathers.


Surf's Up - post #9

Shiverpool Seaquence Color Keys


Surf's Up - post #8

Surfing Styles

I felt that each character should have their own personal surfing style, complete with their own distinctive board-wake...kind of like their signatures left in the water.

Monday, November 19, 2007

Surf's Up - post #7

Last post for a while. I'm going to Hawaii for Thanksgiving to visit my cousin who just moved there. She's been trying to convince me to start an animation studio on the Big Island. I must admit, it sounds attractive. Come on, who's with me?!?!

I'll leave you with this: my painting of Chicken Joe...based on a drawing by Character Designer, Sylvain Deboissy.


Surf's Up - post #6

Posters

I worked on 35 posters in all for Surf's Up...official and unofficial. Here are a few of my poster paintings.

This was my first concept for the poster. I knew marketing would never go for anything so graphic, but I had to get it out of my system. It still think it would have made a cool t-shirt.


This was an early poster done for one of the trade shows. This one, and the ones that follow, I worked on merely as an illustrator. I can't take credit for the concepts, or the basic compositions. (Read between the lines on that statement:)


This was the image that went up on billboards all across the US. I can't take credit for the rendering of the characters; they were handled by the good folks at Imageworks. The actual in-theater poster was a recomposition of this image.
I know, some of the heads are being decapitated by the horizon line. Not my call.


This was the international billboard poster. (Again, I did the scenery, the characters were rendered by Imageworks digital.)


This is the Japanese Poster. The last one I painted and the most dynamic of the bunch. Interestingly, the film still hasn't come out in Japan...sometime next month. (And yet again, the characters are Imageworks digital renders.)


This is the cover of the Surf's Up video game, made by Ubisoft. I would have loved to see this as the actual movie poster. Oh well. (Yeah...yeah...we know...the character is a digital render...blah, blah,blah...)

Surf's Up - post #5

The Waves

Certainly the most memorable images in this film are the waves. When we started, there was a question as to whether or not the kind of waves we knew we were going to need were even possible to create in CG. A highly realistic, start to finish, CG animated wave, that wasn't a cheat, had never been done before in film....at least not to the level we needed. It's was kind of a Holy Grail of CG. A whole slew of folks were behind getting them up on screen. From the work that Todd Pilger and his 3D Vis Dev team did early on, to the staggering work in the final film done by the Imageworks team lead by Rob Bredow, these waves went way beyond anything we hoped we could achieve.

Check out this article on AWN for more on creating the waves.

Our job in the Art Department was to determine what the wave should look like. We did dozens of paintings of waves in all kinds of lighting and weather conditions, and from every conceivable angle. Here are a bunch of them.


Layout: Marcelo Vignali


These last three are based on photos I found on line. Don't know who the original photographers were.


Surf's Up - post #4

Pen-gu Island Beaches

What's a surfing movie without beaches? We painted lots of beaches.
Design credit for the beaches goes to Art Director, Marcelo Vignali, and Chief Location Designer, Armand Serrano, without whom this film would not have existed. OK, it would have existed...it just wouldn't have looked very good.


Layout: Marcelo Vignali

This one was used for the billboard adds. There were characters in front of it.


Here are some color keys I did for the sequence where Cody arrives at the island. Again, compositions for these and all the color keys came from the Layout Department headed up by James Williams.


I can't take credit for the island BG on this one...I "borrowed" it from a Vis Dev Painting by Sunny Apinchapong. Thanks Sunny:)


Sunday, November 18, 2007

Surf's Up - post #3

Shelly Wan asked for some color script stuff. Here you go Shelly:)

We did a LOT of color script (color key) paintings for Surf's Up...hundreds of them. We had six painters working on them for a couple years: Art Director Ron Lukas, Joty Lam, Sunny Apinchapong, Noelle Triaureau, Jerry Loveland, and myself. Ron and Joty did most of them.

For those not familiar with the process: color keys are paintings we use to design the color, lighting, mood, and overall effect of specific sequences in a film. This is where the "cinematography" happens, and in short, is where we determine what all the scenes will look like.

The paintings can be loose or tight, depending upon the needs of a sequence, and the number of paintings per sequence will be determined by its complexity. Some sequences require only one or two keys, while others require dozens.

In the case of Surf's Up, we used frames from the "Rough Layout" pass for composition. Once the paintings are approved, the "Lighting Department" uses them as guides for creating the color and lighting for the final 3D scenes.

(Technical note: In a 3D film, I think it works best when color keys are painted directly on top of frames from the layout department...as opposed to sketches, or storyboards...which is how it's done at some studios. More often than not, the sketches don't end up reflecting the final compositions of the scenes...making the color keys all but useless.)

Here are some color keys I did for the sequence called "Cody and Z Surf".
(For the 3rd, 4th, and 5th key, I lifted Big Z's face from a marketing painting done by Jim Salvati . Thanks Jim.)


Surf's Up - post #2

More Shiverpool


Layout: Armen Melkonian

Surf's Up - post #1

SURF'S UP

In late '03 I began working on Surf's Up, at Sony. I started off simply doing Vis Dev work, but soon was asked to take on the role of Production Designer. For the next four years, I worked with an amazing team of artists, helping to bring surfing penguins to the big screen. Sadly, the film didn't do as well as we would have liked in the box office. Happy Feet really took the wind out of our sails. Maybe I'm biased, but I still think Surf's Up is one of the best animated films to date (CG or traditional), and I feel bad for the kids who's folks didn't take them to see it...they missed out on a really great film. If you haven't seen it already...what are you waiting for?!?

The next few posts will be the work I did for the film. There's four years worth, so this may take a while.

And check out the article I wrote on the production design of the film for Animation World Network.com.

Shiverpool
These were the first two paintings I did for the film. Both are based on layout sketches by Richie Chavez, one of the best designers in the business (I need to work on him to start his own blog...you'll be blown away!)


Tuesday, November 13, 2007

A Rare Personal Piece

I painted this waterfall for my wife, to cheer up the drab delivery room where she gave birth to our daughter. I put the painting directly in her line of sight where she could focus on it...to help bring her to a quiet, calm place, far from the agony of childbirth.

To this day she can't look at it without getting sick to her stomach.
Acrylic

Sunday, November 11, 2007

Lord of the Rings: Illustrations

As promised, here are my LOTR Illustrations...or at least, the ones I don't mind people seeing.
(Note: These are all acrylic...unless otherwise noted.)

Prologue Battle: Mordor
Peter Jackson wanted to know what 600,000 troops, battling on the plains of Mordor, would look like.


Bree

The Hobits enter the town of Bree. Design for a matte Painting.


Waiting Ring Wraith
An obvious homage to Frank Frazeta. Peter was just about to shoot the Bree sequence, and he wanted an image of a Ring Wraith to show the crew, so they would have an idea of what these characters were. Unfortunately, I could never get the horse to look like anything other than a dumpy mule. Not my best painting.


Wraith World
I was assigned the task of figuring out what it would look like when Frodo put The Ring on. After several failed attempts, I finally came up with this image.

We shot 5 Wraiths in costume and full makeup, one at a time in front of a bluescreen. I then composited all of them together, removed all their color, and distorted the snot out of them in Photoshop. Lastly, I painted in lots of wispy streaky stuff, and voilà...Wraith World.


Rivendell
Alan Lee had already designed the individual Rivendell buildings...my task was to try to put them into an environment. If you're questioning the perspective in this painting (or lack thereof), the idea is that it was to represent a 180 degree pan. (Imagine the painting wrapped around your head.)


The painting works a little better if you crop in on it, and only look at small sections.


Orthank Tower (aka The Moth Shot)


Lothlorien
Once again, Alan Lee's architecture...my composition and lighting. (And for those of you who make the inevitable comparison between this, and the Ewok Village, I'll ask you to remember which story was written first.)


Now, if you compare it to the Gungin city...I might not be able to come up with a snappy comeback:)


Helms Deep


The Glittering Caves

In the story, these caves were behind Helms Deep. In fact, Helms Deep was built to guard the caves, which were filled with precious gems.
Originally in the script, Film 3 started out with a romantic scene between Aragorn (Viggo Mortensen) and Arwen (Liv Tyler) in this cave. Liv was to be swimming naked in the pool. The intent was to shoot her with lots of reflections on the surface of the water, to hide all the naughty bits. I of course designed the pool to be lit from below, thus canceling out the reflections and clearly illuminating anything that was in the water. Was that wrong of me? :)
Unfortunately, the entire sequence was cut. No, it was never shot.


Fangorn Forest
Of all the paintings I did for the LOTR films, this one is my favorite.


This was the final design for the location. It's a digital paint-over, on top of the previous painting.


Hennuth Annun Falls
Not my favorite set piece in the films. It looked like it was shot on a sound stage to me...which it was.


Mordor


Barad-Dur
This is a digital composite. The tower is a Miniature; some of the sky is a photo I took; the rest is painted.


Mt. Doom Erupting (Digital)


Elven Boat - Grey Havens


Grey Havens Sketch
(Digital)

Wednesday, November 7, 2007

Open Season

(Don't worry...there's more LOTR on the way.)

In spring of 2003 I began working at the just opened, Sony Pictures Animation studio. Our first film was Open Season. Though I didn't work on the film long, I did do some early Vis Dev. You'll notice a few of the pieces are very reminiscent of the work of Sleeping Beauty designer, Eyvind Earle. The Directors were very interested in seeing if it would be possible to emulate his style in 3D. Fortunately, as the film matured, the style took on a life of it's own. These early paintings are pretty obvious Eivand Earle rip offs...but I still like them:)

(Oh, and with the exception of the drawings, these are all digital.)


I tend to concentrate on designing in color. But from time to time, I'll actually pull out a pencil and draw. Here are a few rare Paul Lasaine drawings.


After sculptures by Raffaello Vecchione
Character Designs by Carter Goodrich


After a sketch by Carter Goodrich.

Sunday, November 4, 2007

Halloween at My House

If you caught my Halloween post a couple weeks back, you'll know we go a bit nuts when it comes to the decorations at our house. (Hey, I'm a production designer...what good would I be if I didn't go all out on Halloween?)

Here's what you see through our living room window, as you walk up the path to the front door.


Here are a few pictures of our graveyard, and the car crash we staged. That's right... we staged an accident on our front lawn. No, we didn't destroy our fence just for Halloween. The fence was rotten and falling down, so we though, as long as we're getting rid of it, we might as well put it to good use. We actually fooled a number of people who thought the wreck was real:)


Thursday, November 1, 2007

Lord of the Rings - Sketches

In 1999, I had the good fortune of being asked to work on Peter Jackson's, Lord of the Rings trilogy. After initially turning down the job (I was under contract with DreamWorks at the time), my wife talked me into accepting the offer. So on July 18th, which in New Zealand is the dead of winter, we left our home in sunny Southern California, bound for Middle Earth.

Initially, I was hired to be a Production Illustrator. But later, I was asked to be the Visual Effects Art Director, as well as the Scenic Unit Director. I would be lying if I said it was anything less than a dream job!

Below are some of the small color roughs I did for the films. (I'll post the larger Illustrations in an upcoming post.) You may have seen some of these images in the "Art Of LOTR" books, but sadly, the color reproductions in those books were terrible. This is what they were supposed to look like.

Unless otherwise noted, these are all acrylic painting.


Tuesday, October 23, 2007

Photo Time

Here are a few photos I took of the stars while camping this summer in Kings Canyon. Notice the meteorite in the last one! Yes, it's real. For those of you who care, I used a Canon D20, on a tripod, with a 10mm wide angle lens. Appature: f3.5 - Shutter Speed: 30 seconds. Except for the sky, it was pitch black out - the light in the trees is me "painting" them with a flashlight.


Sunday, October 21, 2007

Flushed Away

I did a few early vis-dev pieces for Flushed Away...while it was still an Ardman Project. This one's my favorite...mostly because I had a fantastic layout by art director, Pierre-Olivier Vincent (POV). By the way, last year POV won the Annie Award for production design for his work on Flushed Away! For those of you who aren't familiar with the Annies, it kind of like the Academy Awards for animation.

Digital

Shark Tale

This is an illustration I did as the "final look" design for the first animation test for Shark Tale. Other than this, and a couple of concept illustrations, I didn't really work on the film. My good friend Pierre-Olivier Vincent (aka: POV) did the layout for this one.

Acrylic

ElDorado: Waterfall

I was an Art Director on the DreamWorks production of Eldorado for about 10 minutes. Here's the one painting I did that's worth a damn. It's based on a drawing by the production designer, Christian Schellewald, who's one of the best designers I've ever met. As far as I know, he doesn't have a blog, or a web site, though he does have a book...LA/SF: A Sketchbook from California.

Acrylic

MOBY DICK

Often, in the field of visual development, we work on projects that never see the light of day. That was the case with the ill-fated, Moby Dick (from the whale's point of view) at DreamWorks. At first, when I was asked to help develop it with directors Paul & Gaëtan Brizzi, I though it was a joke. After all, it was a throw away line from Wag the Dog. But After working on it for a while, I came to realize it had a lot of potential...if done right. Unfortunately, the studio lost faith in the project, and shelved it.

Here's some work I did for the show. Sadly, this is probably the only place you'll ever see it.

Digital


Digital


Digital


Acrylic


Layout: Paul & Gaëtan Brizzi

Digital


Digital


Layout: Paul & Gaëtan Brizzi

Acrylic

Wednesday, October 17, 2007

THANKS!!!

Wow, thanks for the great response everyone! The outpouring of positive comments is really wonderful....if not a bit overwhelming. Thank you! I'll try to respond to everyone, but you may have to give me some time. In the meantime here's another post. Dice, you get your wish!

In 1994 I left Disney, and matte painting, to embark on a new path - one that I hoped would lead to Art Directing. I signed on with DreamWorks Animation to work on their first 2D feature, The Prince of Egypt. I started off as a visual development artist, and ended up as a co-supervisor of the background painting department.

The following images are a small sample of the hundreds of painting I did for the film. Some of them are pre-production design illustrations, and some are actual backgrounds. None of them are digital. Other than touch ups, color correction, and hieroglyphs, all the painting on POE was done traditionally. Our background department didn't go digital until our second film - ElDorado.

As animation work tends to be a very collaborative process, the layouts for many of these paintings were done by some of my colleagues...in which case I'll do my best to remember who the artists were, so I can give them proper credit.


Layout: Mark Mulgrew / Darek Gogol


Layout: Darek Gogol


Layout: Darek Gogol


Layout: Darek Gogol


Layout: Richie Chavez


Layout: Benoit Le Pennec


Layout: Christian Schellewald


Layout: Christian Schellewald


Layout: Richie Chavez / Mark Mulgrew


Layout: Richie Chavez / Mark Mulgrew

Thursday, October 11, 2007

First Post: Matte Paintings

I thought it fitting that for my first post, I go back to my humble beginnings in the film business...as a Matte Painter. In March 1988, I began working at The Buena Vista Visual Effects Group (Disney, for those of you not in the know) as an apprentice matte artist, fresh out of art school. I spent the next 7 years in the matte biz...mostly at Disney...though I also did a bit of freelance at other studios.

All but two of the paintings in this section (the paintings for The Jungle Book and Lord of the Rings) are what are now referred to as “Traditional” matte paintings (i.e. not “Digital”). I started in the matte business, only a few years before the digital revolution happened. I was fortunate to have been one of the last of the matte artists who actually painted on glass…with real paint…which means that I was also one of the first of the new breed of matte artists that painted on computers, when my Matte Department went digital a few years later.

Unfortunately, I never found digital matte painting as much fun, or as challenging as traditional matte painting (sorry, no offense to you digital matte painters out there.) So in 1995, I hung up my matte painting brushes and started concentrating on concept design and art direction.

Here are a but a sad few of the matte shots I actually have digital files of. They’re all in the “before and after” format, with the live action first, and the final composite last. A couple of them didn’t have any live action, so there’s just a painting.

My first big show was...

DICK TRACY


THE EL (Elevated) TRAIN:
This was the first “finaled” matte painting for Dick Tracy. I painted it along with my supervisor, Mike Lloyd. After finishing it, the director (Warren Beatty) came by to take a look. He said that it looked totally real - that if he didn't know it was a painting, he would have been totally fooled...in other words, it was completely wrong. What he was looking for was an unreal world - one that didn't exist and couldn't be filmed. The best example we had were the matte paintings Peter Ellenshaw did for Mary Poppins, which were very idealized versions of the real world. So we went back into the painting with an eye for pushed color and graphic compositions. Warren loved it, and the "Tracy" style was born.


TRACY TOWN:
This painting is the background level of a multi-plane painting of the city. The character was shot in front of a blue screen and composited into the painting.
The first Batman film came out while I was working on this shot. In honor of it, I hid a little Batman in the painting.


THE BRIDGE:
This is one of the several paintings we did to create The Bridge location, for the climax of the film. Except for a few limited set pieces, almost all of the bridge was created by matte paintings. Most of this scene is painted, with the "real" portion of the scene being the stair case and a small, square section of wall behind it.


The WAREHOUSE:
This painting took about two weeks to paint. Only when I was done with it, did someone point out that I'd misspelled "Warehouse". Go back...fix it.
By the way, in keeping with a long Disney tradition, we hid Mickey Mouse in almost every matte shot in Dick Tracy. Can you spot him in this one?

DAVE


ON THE WHITE HOUSE LAWN:
In Dave, when the White House appears on screen, it's almost always a matte painting. Why not just shoot the real White House? You can't. No cameras crews are allowed to set up on the White House grounds. You're welcome to shoot from the sidewalk, but if you need a shot from within the gates, you have to create it yourself. Building an entire full size replica of the White House would be incredibly expensive. So sections of it were built and extended with matte paintings. For this scene, the center portico was built as a setpiece at the Los Angeles Arboretum. I painted the rest.


THE WHITE HOUSE AT NIGHT (NORTH PORTICO):
If an Art Department is really on the ball when they're designing a matte shot, they'll build just enough set to serve as a backdrop for anything that moves in the scene. Anything outside the "motion area" can be handled by the matte artist. In this case, the moving object is the car, and the only portion of the White House that was built, was the low wall that's visible just above the car's roof.


THE WHITE HOUSE AT NIGHT (SOUTH PORTICO):
This scene was cut from the film just after I finished painting it. As a consolation prize, my boss said I could have the painting, which, at Disney, was almost unheard-of. There must have been a curse on it though, because of all the hundreds of paintings on glass in the matte department, the only thing we lost in the 1994 Northridge Earthquake was this painting.


THE WHITEHOUSE FROM THE MALL:
This scene could have been shot for real on The Mall in Washington D.C. However, the crew was here in L.A., and it wouldn't have been worth it to send everyone to Washington for one shot, so we shot the live action plate here in L.A., on the golf course in Griffith Park at about 2am. As the painting needed to represent an existing location, it was necessary to get some good photo reference of the real thing... which I shot from the base of the Washington Monument, in 5 degree weather, sometime around midnight, in January of '93. I’ve never been so cold in my entire life.

THE SANTA CLAUSE

NEIGHBORHOOD:
When doing a matte shot, it's a good idea to get a few frames of the surrounding footage to help you to understand the environment, lighting, mood, etc. Sometimes, you don't get any surrounding footage, or the cuts you get, don't help any. That was the case for this painting. The surrounding shots were all closeups of the actors, shot on a soundstage. The only set piece was a chimney, and two, out-of-focus, phony pine trees. The art department gave me architectural plans of the houses, but that was it.


THE NORTH POLE:
I wish this shot looked better in the final film, because I was really happy with the painting itself. It was my fastest painting ever. Everything was working right, and even though it was a pretty large painting (5 feet across), I completed it in one day.


SANTA'S VILLAGE:
This one, I did not complete in a day...it was more like a month. The concept here was that Santa's workshop was under the polar ice cap. I felt that a mix of architectural styles would give it a timeless appeal, as though this place has been here for a long time. There's renaissance, baroque, gothic, art nouveau, Victorian, etc., all rolled into one. I started this painting by roughing in all the buildings as dark silhouettes. That way I could see how all the big shapes worked against one another. Once I was happy with the space and the atmosphere, I turned the lights on.

THE DISTINGUISHED GENTLEMAN


NEIGHBORHOOD:
Most traditional matte paintings were painted on glass…a rather delicate material upon which to create a work of art, to say the least. Some of the old time matte painters boast that they never had a painting break during their careers. I wasn't so lucky. I lost two - this was one of them. The easel that I was using, gave out in the middle of the night and fell over. I found the painting in a million pieces the following morning. Fortunately, I'd finished it the night before, and we shot it for final approval before we went home. Lucky for us, it was approved by the director, who didn't know that he couldn't have another re-shoot if he didn't approve it.

ALIEN III


SPLASHDOWN SEQUENCE - GANTRIES:
Most of my work, I do in acrylic. This however, is one of the few matte paintings I painted in oil, and I think it's one of my best paintings. Unfortunately, I'm not happy with the way the shot ended up in the final film. C'est la vie.

THE JUNGLE BOOK


THE TEMPLE:
This was one of my first all digital matte paintings. This is pre-Photoshop; we used the painting module from Disney's CAPS compositing system. It was pretty rudimentary.
Part of this painting was done by Chris Evans.

THE LORD OF THE RINGS


RIVENDEL:
In 1999, I moved to New Zealand to work on The Lord of the Rings. Later I'll dedicate an entire post to my LOTR work. But in the meantime, here is one of the matte paintings I designed for The Fellowship Of the Ring. I say "designed", because this is really just an illustration of what I wanted the shot to look like. The final painting was done by Laurent Ben-Mimoun. Check out his web site... http://www.blueman.ws/